Another Hotwire Experiment
Again, continuing my learning on Hotwire, I just want to share what I already build, and how.
I hope you can get something from this, enjoy the reading!
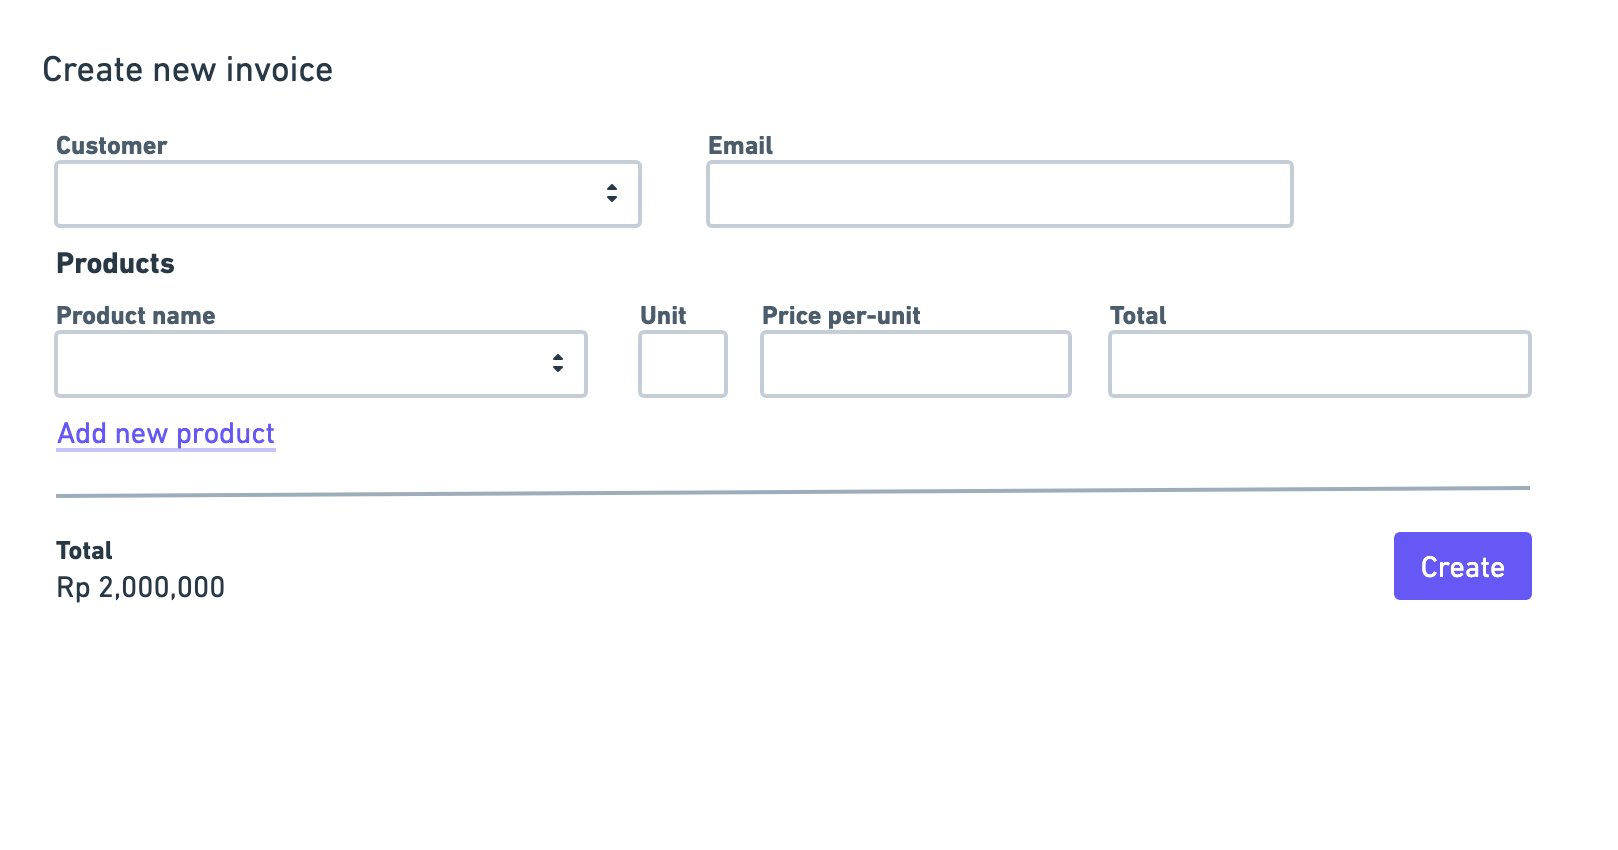
Here’s the sample feature that we want to build:
It’s an interactive form to create an invoice.
Hotwire
Before we go deep into technical details, let’s define some words. Hotwire is a tool or framework to help programmers build an interactive feature (aka Javascript things) on Rails.
Examples of interactive features:
- When you want to sign up to Twitter, and then there is a message shows up to check if your username or password valid every time you type input in that text field.
- When you chat online via the WhatsApp web app, then there is a new message show up to you before you request or refresh the page.
- And so on.
Before Hotwire comes up, we still can build that kind of feature in Rails. We can use vanilla JS integrated using Sprockets, component-based javascript frameworks like React.js or Vue.js integrated using Webpacker, JQuery, or another thing.
I can say that we don’t have a default answer for how to write this thing in Rails, and I don’t get the joy of writing those features before Hotwire comes up.
Now, we have the default answer. Hotwire has already been added to the menu, the menu is omakase!
And I can promise with this tool, you can find joy again in writing Javascript in Rails.
Stimulus.js
Hotwire is a tool or framework that contains some jargon like Turbo, Stimulus.js, and Strada. Strada is not released yet at this time, so let’s ignore this for now.
- Turbo is a new Turbolinks. We’ll talk in detail about this when building the feature.
- Stimulus.js is a javascript framework for the HTML that you already have.
Stimulus allows us to make an interactive feature with HTML that we already have it. It’s different from some popular component-based JS frameworks like Vue.js, and React.js.
In a component-based JS framework, we need to generate the HTML from JS code or another templating format. The disadvantage of that approach compared with Hotwire ways is we have a lot of work.
Stimulus.js is an MVC Javascript framework. They have Models, Controllers, and Views just like Rails.
You can see the sample of codes from their web homepage.
Here are the sample HTML, and JS codes:
<!--HTML from anywhere-->
<div data-controller="hello">
  <input data-hello-target="name" type="text">

  <button data-action="click->hello#greet">
    Greet
  </button>

  <span data-hello-target="output">
  </span>
</div>
// hello_controller.js
import { Controller } from "stimulus"

export default class extends Controller {
  static targets = [ "name", "output" ]

  greet() {
    this.outputTarget.textContent =
      `Hello, ${this.nameTarget.value}!`
  }
}
The HTML we can generate from our lovely Erb, does not need a new template engine or JS code to generate.
This is the example result:
hello_controller.js is the controller, which is the class responsible for accepting input, processing it, and making it a result or output.
this.nameTarget, and this.outputTarget were models. this.nameTarget will refer to the input field, and this.outputTarget will refer to span field. They connected via data-model-target attribute.
data-action="click->hello#greet" means that if users click the button, please run the greet method inside Hello controller. Have a similar concept with Rails routes.
In Rails routes we see
get 'hello', to: 'hello#world'
Is means if users request to /hello via the GET method, please run the world method inside the Hello controller.
That’s all for the concept, if you already understand this, you can write Stimulus.js with joy.
Study case
Now, let’s try to build something with Hotwire.
We will create a create invoice form feature. In that form, we need to allow the user to choose the customer and then the list of products attached to that invoice.
This feature was inspired by the accounting software that I currently working for.
Here’s the example database design for the feature:
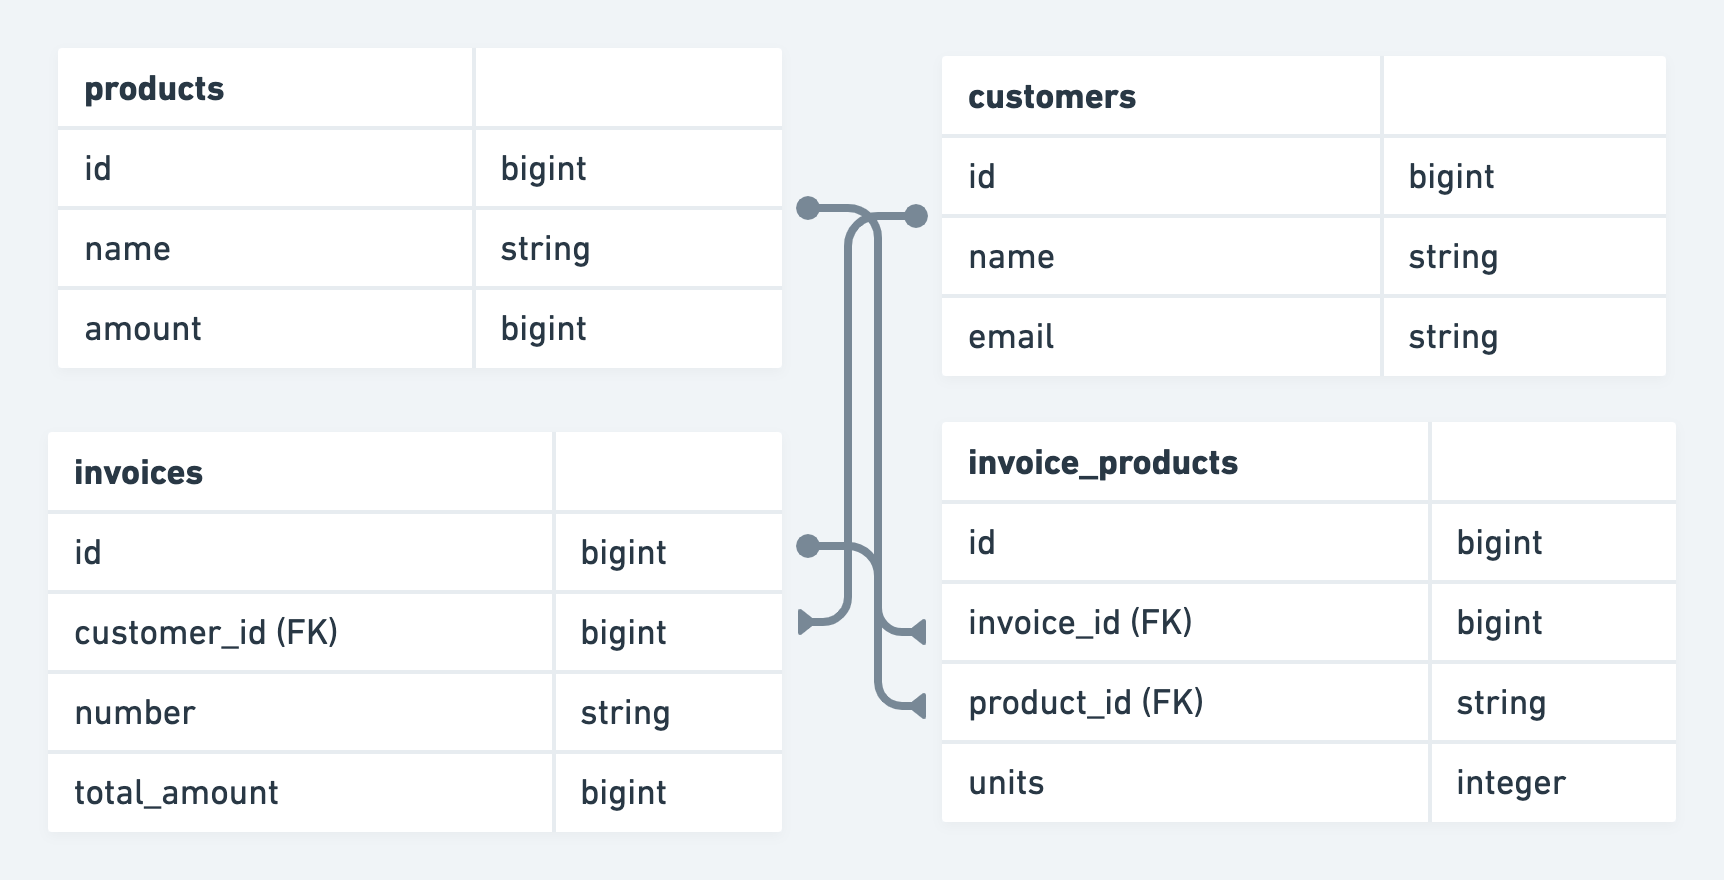
Here’s the example UI:
First, let’s build the customer input:
To build this feature we can create a select tag, where the value from the options was the customer’s email:
<%= form.select :customer,
                Customer.all.pluck(:name, :email),
                { prompt: 'Select Customer' },
                { required: true, class: 'form-control', data: { action: 'change->invoices#updateEmail' } } %>
And create the disabled email text field, where we show the information about the selected customer’s email.
<%= form.text_field :email, class: 'form-control', disabled: true, class: 'form-control', data: { 'invoices-target': 'emailField' } %>
After that, we can trigger a Stimulus action.
data: { action: 'change->invoices#updateEmail' }
This means that every time users change the value from the select tag, we can run the updateEmail method inside the invoices controller.
// app/controllers/invoices_controller.js
import { Controller } from "@hotwired/stimulus"

export default class extends Controller {
  static targets = ["emailField"]

  updateEmail(event){
    this.emailFieldTarget.value = event.target.value
  }
}
In that method, we can receive the selected customer email by even.target.value then we update the DOM of the email field.
That’s all. Now, the selection of customer input already working as expected.
Now, we continue to implement the selection product feature:
On this feature, we will:
- Provide the list of products. And after users choose one of the products:
- Update the unit text field with
1. - Update the price per unit text field.
- Update the total with “unit * price per unit”.
This is the code for showing the list of products:
<%= product_form.select :product_id,
                              options_for_select(products_options),
                              { prompt: 'Select product' },
                              class: 'form-control',
                              required: true,
                              data: { 'invoice-products-target': 'productItem', action: 'change->invoice-products#updatePrices' } %>
# app/controllers/invoices_controller.rb
# ...
def products_options
  products = Product.all
  products.map { |product| [product.name, product.id, { data: { price_per_unit: product.amount } }] }
end
# ...
From the backend, we need to show the information about the product’s price per unit information to the client.
Here’s the client’s code:
import { Controller } from "@hotwired/stimulus"

// Connects to data-controller="invoice-products"
export default class extends Controller {
  static targets = ["unit", "productItem", "pricePerUnit", "total"]

  // ...
  updatePrices(event) {
    if(event.target.selectedOptions[0].value == '') {
      this.unitTarget.value = ''
      this.pricePerUnitTarget.value = ''
      this.totalTarget.value = ''
    } else {
      this.pricePerUnitTarget.value = this.toIdr(this.findPricePerUnitFor(event.target))
      this.unitTarget.value = 1
    }
    this.totalTarget.dispatchEvent(new Event('change'))
    this.unitTarget.dispatchEvent(new Event('change'))
  }

  findPricePerUnitFor(element) {
    return element.selectedOptions[0].dataset.pricePerUnit
  }

  toIdr(number) {
    const idr = new Intl.NumberFormat('id').format(number)
    return `Rp ${idr}`
  }
}
findPricePerUnitFor will fetch the related price per unit product information. You can learn more about the APIs from this documentation.
One more thing, as you realize we need to make the unit text field responsive. When users change the unit to any number, we need to update the total price. We can implement this feature with add logic in our client like this:
<%= product_form.number_field :unit, class: 'form-control', required: true, data: { action: 'change->invoice-products#updateProductItemPrice', 'invoice-products-target': 'unit' } %>
import { Controller } from "@hotwired/stimulus"

// Connects to data-controller="invoice-products"
export default class extends Controller {
  static targets = ["unit", "productItem", "pricePerUnit", "total"]

  updateProductItemPrice(event) {
    const pricePerUnit = this.findPricePerUnitFor(this.productItemTarget)
    const total = pricePerUnit * event.target.value
    this.totalTarget.value = this.toIdr(total)
    this.totalTarget.setAttribute('data-amount', total)
    this.totalTarget.dispatchEvent(new Event('change'))
  }

  // ...
}
Now, the customer selection feature is already done.
Next, we will continue building the “add new product” link.
It’s time to talk about Turbo. Because to implement this kind of feature, we need to write in Turbo.
You can imagine Turbo is just like a remote form that you already know.
In Hotwire, we can create a link, that can process in the background, and then change the existing DOM without refreshing any page or changing any URL state.
I already create an article that provides a sample workflow in Turbo, you can check out that article to learn more about that.
So, without further do, here’s the implementation for that feature.
First, let’s create the link:
<%= link_to 'Add new product', add_product_item_invoices_path, data: { turbo_method: 'post' } %> <br>
Then, create the routes:
Rails.application.routes.draw do
  resources :invoices, only: %i[new create index] do
    collection do
      post :add_product_item
    end
  end
  root to: 'invoices#index'
end
The code means that if users click the “Add new product” link, Rails will trigger an HTTP request in the background the related routes, here are the sample logs:
Started POST "/invoices/add_product_item" for ::1 at 2022-11-16 07:35:58 +0700
Processing by InvoicesController#add_product_item as TURBO_STREAM
This is similar to the remote form that already exists in Rails 5.
Inside the controller we can do something like this:
# app/controllers/invoices_controller.rb
class InvoicesController < ApplicationController
  # ...

  def add_product_item
    respond_to do |format|
      format.html { head :no_content }
      format.turbo_stream
    end
  end
end
As you can see in the logs, the HTTP request name for this kind of request is “TURBO STREAM”. So, Rails will run the format.turbo_stream and will run this view:
<%# /app/views/invoices/add_product_item.turbo_stream.erb %>
<%= turbo_stream.append :invoice_products_form do %>
  <%= render 'invoice_product_form', invoice: Invoice.new %>
<% end %>
This code means:
- Rails will find the DOM with id=”invoice_products_form”.
- After finding the DOM, Rails will append a new DOM where the new DOM content was the view from the ‘invoice_product_form’ partial.
Here are the completed ERB templates:
<%#  /app/views/invoices/new.html.erb %>
<div class="container mt-4">
  <div class="row">
    <div class="col-md-12">
      <h5>Create a new invoice</h5>
      <%= link_to 'Back to invoices list', root_path %>
    </div>
  </div>

  <div class="row">
    <div class="col-md-12">
      <%= form_with(model: @invoice, data: { controller: 'invoices' }) do |form| %>
        <div class="form-group mt-2 row">
          <div class="col-md-6">
            <%= form.label :customer, class: 'form-label' %>
            <%= form.select :customer,
                Customer.all.pluck(:name, :email),
                { prompt: 'Select Customer' },
                { required: true, class: 'form-control', data: { action: 'change->invoices#updateEmail' } } %>
          </div>
          <div class="col-md-6">
            <%= form.label :email, class: 'form-label' %>
            <%= form.text_field :email, class: 'form-control', disabled: true, class: 'form-control', data: { 'invoices-target': 'emailField' }  %>
          </div>
        </div>

        <span class="fw-bold d-block my-4">Products</span>

        <%= turbo_frame_tag :invoice_products_form do %>
          <%= render 'invoice_product_form', invoice: @invoice %>
        <% end %>

        <%= link_to 'Add new product', add_product_item_invoices_path, data: { turbo_method: 'post' }, class: 'd-flex mt-4'  %>

        <hr>
        <div class="row d-flex align-items-center">
          <div class="col">
            <span class="d-block">Total</span>
            <span class="fw-bold" data-invoices-target="total">Rp 0</span>
          </div>
          <div class="col d-flex flex-row-reverse">
            <%= form.submit 'Submit', class: 'btn btn-primary px-4' %>
          </div>
        </div>
      <% end %>
    </div>
  </div>
</div>
<%#  /app/views/invoices/invoice_product_form.html.erb %>
<%= fields_for('invoice_products[]', invoice.invoice_products.build) do |product_form| %>
  <div class="form-group row my-2" data-controller="invoice-products">
    <div class="col-md-4">
      <%= product_form.label :product_name, class: 'form-label' %>
      <%= product_form.select :product_id,
                              options_for_select(products_options),
                              { prompt: 'Select product' },
                              class: 'form-control',
                              required: true,
                              data: { 'invoice-products-target': 'productItem', action: 'change->invoice-products#updatePrices' } %>
    </div>

    <div class="col-md-2">
      <%= product_form.label :unit, class: 'form-label' %>
      <%= product_form.number_field :unit, class: 'form-control', required: true, data: { action: 'change->invoice-products#updateProductItemPrice', 'invoice-products-target': 'unit' } %>
    </div>

    <div class="col-md-2">
      <%= product_form.label :price_per_unit, class: 'form-label' %>
      <%= product_form.text_field :price_per_unit, class: 'form-control', disabled: true, data: { 'invoice-products-target': 'pricePerUnit' } %>
    </div>

    <div class="col-md-4">
      <%= product_form.label :total, class: 'form-label' %>
      <%= product_form.text_field :total, class: 'form-control', disabled: true, data: { 'invoice-products-target': 'total', 'invoices-target': 'totalItem', action: 'change->invoices#updateTotal' } %>
    </div>
  </div>
<% end %>
Done, our add product link now already worked as expected.
turbo_stream has multiple available methods, you can check this and this to know more about them.
The final thing, it’s the backend code. There is no relation to the Hotwire so I think it’s pretty self explanatory:
class InvoicesController < ApplicationController
  # ...
  def create
    ApplicationRecord.transaction do
      customer = Customer.find_by(email: params[:invoice][:customer])
      invoice = Invoice.create!(customer: customer)
      total = 0
      params[:invoice_products].each do |product_item|
        invoice_product = invoice.invoice_products.create!(
          product_id: product_item[:product_id],
          unit: product_item[:unit]
        )
        total += invoice_product.product.amount * invoice_product.unit.to_i
      end
      invoice.update!(total: total)
    end
    redirect_to invoices_path
  end
  # ...
end
Conclusion
That’s all, for the complete code, you can go to the codebase.
All the code in this example was first written, I don’t do refactoring, so forgive me for the bad naming and poor performance. The goal is not to write the production code, but to explain the overview of how to write reactive features in Hotwire.
I hope you got some information from this article, and enjoy reading it.
See you in the next article!